It's apple time 2022 in Indiana

wigs

Well-known member
Note from Wigs: I have been using my mom's ingredients for apple pie my entire life (with cinnamon only in the filling), but recently ran across an Internet recipe that piqued my curiosity due to its calling for several spices. At first read, I thought it sounded more like a pumpkin pie flavoring list of spices instead of ones for apple pie, but I decided to give it a go, and the outcome was delicious! My husband, his siblings + their spouses all loved this version as did I.

There are additional explanations & hints plus the authors' photos and their video can be found at the URL listed at the very end of this post. !!!

Our Favorite Apple Pie​

  • PREP 1hr 30mins
  • COOK 1hr 15 mins
  • TOTAL 2hr 45mins
We realize our apple pie recipe may seem longer than others, but don’t let that scare you off. We’ve simply added as many tips to the recipe to ensure you make the best apple pie possible. Use our recipe to achieve apple pie with perfectly cooked (not mushy) apples surrounded by a thickened and tasty sauce all baked inside a flaky, golden-brown crust. The pie crust recipe we use for this apple pie is the same as all other pies on Inspired Taste. This flaky pie crust recipe never fails us. You can use any pie crust for this pie but, for the best results, we highly recommend our recipe.

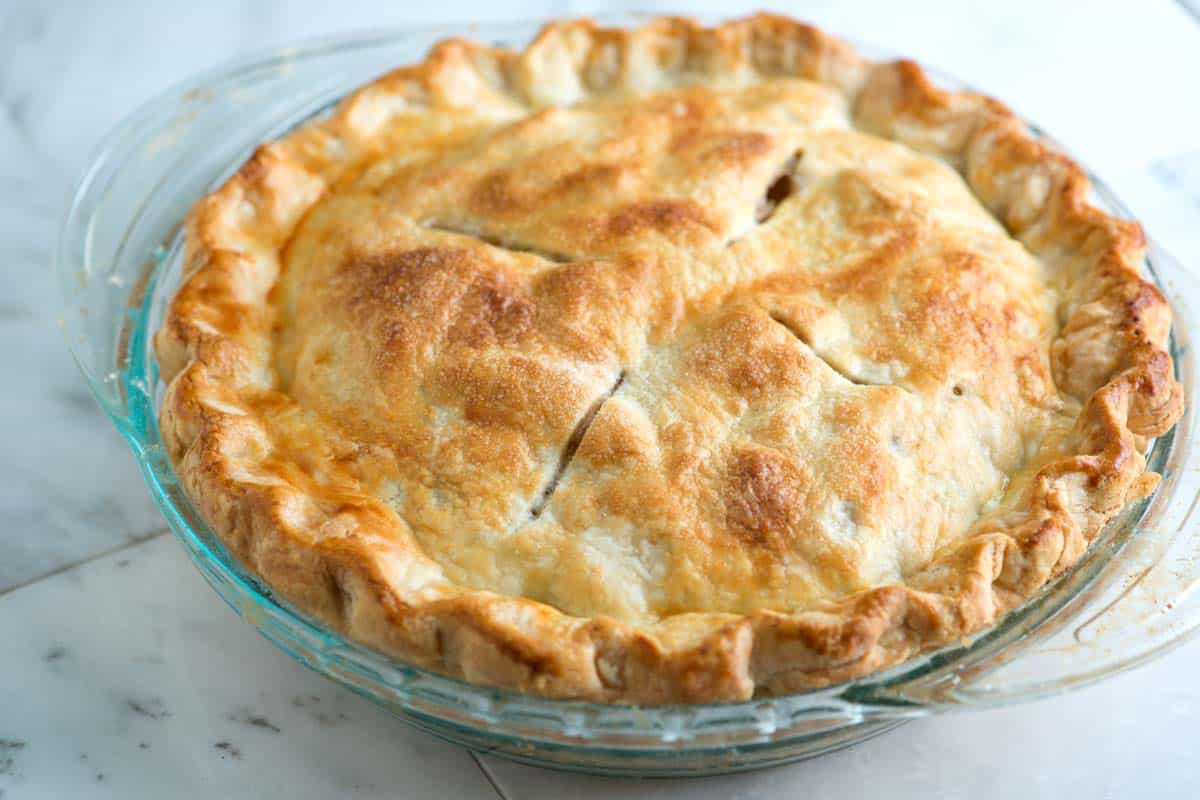
How to Make Perfect Homemade Apple Pie​

It’s taken us a while to zero in on our favorite method for making apple pie, but I think we’ve finally nailed it. This simple recipe guarantees perfectly cooked apples surrounded with a thick gently spiced sauce. There’s no need for pre-cooking the sauce or apples and the steps to make this pie are simple, you just need a little time.

Makes one (9-inch) pie. (I used a 10" clear glass Pyrex pie plate and so increased my crust amounts to fit. Wigs)

YOU WILL NEED​

Pie dough for top and bottom 9-inch pie, chilled, see our Flaky Pie Crust Recipe Note from Wigs: I have not tried the Inspired Taste pie crust yet, but plan to in the future. It's at:
4 to 4 ¼ pounds baking apples (7 to 8 apples). See notes below* for suggestions regarding types of apples (Before peeling and coring, I weighed out 4-1/2 lbs of a variety of apples--primarily Jonathans. Wigs)
1/2 cup (100 grams) light or dark brown sugar
1/2 cup (100 grams) granulated sugar (I used a heaping 3/4 cup of granulated sugar. Wigs)
1/4 teaspoon fine sea salt
1 teaspoon ground cinnamon
1/4 teaspoon ground ginger
1/4 teaspoon ground cardamom
1/4 teaspoon ground allspice
1/4 teaspoon freshly grated nutmeg
2 tablespoons cornstarch or use 4 tablespoons tapioca flour/starch (I used 4 Tbsp tapioca flour. Wigs)
1 tablespoon butter
1 egg (Instead of an egg wash on my top crust, I brushed mine with whole milk--or half & half would work well. Wigs)
Wigs: I also sprinkled my sliced apples with 1-1/2 Tbsp. of freshly squeezed lemon juice.


MAKE APPLE FILLING
  • Peel, and then cut the apples in half. Remove the cores, and then slice apple halves into thin slices, about 1/4-inch thick. Place the apple slices into a very large bowl.
    Scatter both sugars, salt, and spices over the apples, and then use your hands to toss them, coating the apple slices as much as possible. Set aside for 1 hour at room temperature.
PREPARE PIE CRUST
  • Roll out the first half of pie dough on a lightly floured work surface. To prevent the dough from sticking and to ensure uniform thickness, roll from the center of the dough outwards and keep lifting up and turning the dough a quarter turn as you roll. Check for the correct size by inverting the pie dish over the dough. The dough should be about 1 1/2 to 2 inches larger than the dish.
    Being careful not to stretch it, place the dough into the pie dish, and then trim overhanging dough to within 3/4-inch of the edge of the dish. Refrigerate while you make the pie filling.
    Roll out the second half of the dough to a similar size as before and transfer it to a large parchment-lined baking sheet. Keep this in the refrigerator until needed.
PREPARE OVEN
  • Position an oven rack towards the center of the oven, and then heat the oven to 400 degrees Fahrenheit (200C). (I bake my fruit pies at 400 degrees F for 15 minutes and then turn down the temp to 350 degrees F for the remaining bake time of anywhere from 45 minutes to 1 hour or possibly a bit longer--until you see the juices bubbling and the top crust is a nice golden brown. If your pie is browning too quickly, but the apples aren't done yet, just cover the top with some aluminum foil. Wigs)
ASSEMBLE PIE
  • Toss cornstarch (or tapioca) with the apples. Transfer most (if not all) of the apples into the prepared bottom crust, using your hands to really pack them down into the pie. Fill the pie until apples are mounded at the same height or a little higher as the edge of the pie crust, tucking in as many as you can. If you have too many apples, save them (see notes). See our video showing how high we pile the apples.
    Pour the juices that have accumulated at the bottom of the bowl over the apples. (If it looks like there’s more than 3/4 to 1 cup of liquid, you might want to leave some behind, see notes below). Cut a tablespoon of butter into 8 or so small pieces and dot them over the pie.
    For a double-crust pie, place the second pie dough round over the filling or cut it into strips and lattice the top (See our video in the article above or read this tutorial for how to lattice pie crust). If you are not adding a lattice crust and instead are adding the top crust in one piece, use a sharp knife to cut a few slits in the top of the crust to allow steam to vent.
    Trim excess dough from the top crust or lattice strips, and then fold the overhang underneath itself, forming a thick rim. Press it together or crimp it with your fingers (or use a fork).
    Whisk the egg with a tablespoon of water, and then use it as an egg wash by lightly brushing the top crust. This adds shine and helps the crust brown.
BAKE PIE
  • Place the prepared pie onto a baking sheet lined with parchment paper (this can be the same lined baking sheet used for chilling the top crust). Bake the pie for about 75 minutes, turning a few times for even browning.
    If you notice that the pie crust is browning too quickly, mold a large piece of foil over a bowl that’s been placed upside down to make a foil dome. Place the foil dome over the pie for the remaining bake time. This will slow the browning.
    Apple pie is done when the juices are bubbling through the vents of the top crust or lattice. If you do not see bubbles, the pie needs more time. Another way to check for doneness is to use an internal thermometer. Pierce the pie in the middle then test the temperature. The pie is done when it reads 195 degrees Fahrenheit (90C). Piercing the pie is also a nice indication of how soft the apples are. If they feel too crunchy, the pie needs more time.
SERVING
  • Be sure to cool the pie, without slicing into it, for at least 1 hour, preferably longer. Keep in mind that the pie filling does not fully thicken until it is completely cooled. So, for the absolute best results, cool the pie to room temperature, and then place it into the refrigerator for an hour or two.
    Waiting to cut into the pie until cool will prevent a soggy slice.
STORING AND LEFTOVERS
  • Leftover pie will keep, at room temperature, for 2 to 3 days or in the refrigerator up to a week. Rewarm slices in a 350 degree Fahrenheit oven for 5 to 10 minutes before serving them.
ADAM AND JOANNE'S TIPS
  • Best apples to use: For the most apple flavor, try a couple varieties of apples in your pie. We especially love Honeycrisp, Granny Smith, Jonagold, Braeburn, Mutsu, Pink Lady, Golden Delicious, and Jazz
  • Leftover apples: Sometimes, not all the apples we sliced make it into our pie. That’s okay, though! To use them up, add them to a skillet with a splash of water, apple juice, or nothing at all and cook until softened. A little butter or coconut oil added to the pan is also quite delicious! Serve the apples over ice cream or oatmeal.
  • Liquid amount: After 1 hour of letting the apples sit with the sugar, salt, and spices, we consistently get about 3/4 cup of liquid left at the bottom of the bowl. A little more or a little less is fine, but if you find that your apples released much more, you might want to consider leaving a little behind. (When apples are overripe, they can release more liquid than usual, which can make your pie a bit more runny.)
  • Recipe has been inspired and adapted by Bravetart’s apple pie.
  • !!! The original full apple pie recipe post can be found on Inspired Taste's URL here: Our Favorite Apple Pie
 
Last edited by a moderator:
Whenever I make apple pie I make sure that in addition to cinnamon and nutmeg I use cardamom and allspice:)
 
This is a really comprehensive instruction for a new cook! Good one. I just bought a big bag of organic baking apples from the discount shelf. This is not like Mom's recipe but I'll give it a try. Thanks Deb.
 
I'm sitting here, reading this while my oven is "auto-cleaning." It's doing that because the ENTIRE INTERNAL SURFACE is covered with sticky apple-y juice with the perfect amount of spices, my own applesauce and my own reduced apple cider syrup. I know it was perfect because I did a test pie earlier in the day so I knew exactly what to adjust: more cinnamon, less lemon, more sugar, a bit more grinds of nutmeg and black pepper. And why is this, you may ask? It's because the double crust apple pie that I made last night for the county fair today decided to overflow. And overflow. And overflow. And then it cracked my pizza stone. And then smoke began to billow from every crevice. And then the smoke alarm started blaring. And then I pulled the silicone oven liner out and all the sticky stuff slide off its non-stick surface onto the bottom of the oven. So I finally pulled the pie out and it CONTINUED TO BUBBLE OVER all over my glass stove stop. My pot holders are covered with sticky syrup. My dish towels are covered with sticky apple syrup. My wrists are burnt from sticky apple syrup.

And I'm STILL going to try your pie, wigs.
Marilyn, bless your heart--you are one glutton for punishment! Even the recipe I just posted says to line a baking sheet (I strongly suggest you use one having sides!) with parchment paper to set your apple pie on before baking it. I have learned to use an underliner method to avoid exactly what you so recently experienced which is NO FUN. Gads, you really had some residual damage. I hope your wrists aren't too badly burned. Sugar syrup of any kind can cause one nasty burn because it won't "let go". I'll keep my fingers crossed that your pie wins the coveted purple ribbon at the fair!
 
Whenever I make apple pie I make sure that in addition to cinnamon and nutmeg I use cardamom and allspice:)
Deb, you are definitely way ahead of me in the apple pie baking department because this recipe was the first time I tried using anything more than cinnamon--and I loved the end product. The flavor of this apple pie recipe is in no way reminiscent of pumpkin pie which was my first very erroneous thought. And the next time I crank out the above apple pie I am going to try the Inspired Taste's pie crust recipe. I usually steer clear of all-butter pie crust because the one time I made one (thinking the taste would be better), it came out tough IMHO. I typically use half butter and half vegetable shortening--and for my side of the family, I make the lard crust my mom always used to make.
 
This is a really comprehensive instruction for a new cook! Good one. I just bought a big bag of organic baking apples from the discount shelf. This is not like Mom's recipe but I'll give it a try. Thanks Deb.
No sillllly, I meant Wigs. Thanks WIGS.
 
I'm sitting here, reading this while my oven is "auto-cleaning." It's doing that because the ENTIRE INTERNAL SURFACE is covered with sticky apple-y juice with the perfect amount of spices, my own applesauce and my own reduced apple cider syrup. I know it was perfect because I did a test pie earlier in the day so I knew exactly what to adjust: more cinnamon, less lemon, more sugar, a bit more grinds of nutmeg and black pepper. And why is this, you may ask? It's because the double crust apple pie that I made last night for the county fair today decided to overflow. And overflow. And overflow. And then it cracked my pizza stone. And then smoke began to billow from every crevice. And then the smoke alarm started blaring. And then I pulled the silicone oven liner out and all the sticky stuff slide off its non-stick surface onto the bottom of the oven. So I finally pulled the pie out and it CONTINUED TO BUBBLE OVER all over my glass stove stop. My pot holders are covered with sticky syrup. My dish towels are covered with sticky apple syrup. My wrists are burnt from sticky apple syrup.

And I'm STILL going to try your pie, wigs.
For a moment, I thought I was smiling; then I realized it was a wince. What a disaster. Isn't it a miracle that we don't get permanently discouraged!? Poor You.
 
Hey wigs,
Could you edit the apple pie recipe so it doesn't have as many indents? I was looking at this thread on my phone this morning and couldn't figure out what I was seeing. Then I remember yesterday (when I was on my 16" laptop) that the author had indented and then indented and then indented the various steps. What this ends up displaying on a phone is a single line of letter, like this:

IMG_7787.jpg

I can also edit the recipe if you would prefer. Just let me know.
PS: My wrists are feeling much better today. Thanks for caring.
PPS: I didn't win anything at the fair.
 
No sillllly, I meant Wigs. Thanks WIGS.
Hi, Marg--you are very welcome! I had to smile when I read your comment about the Inspired Taste's apple recipe being "a really comprehensive instruction for a new cook". No joke! I smiled because all my mom's own personal recipes were typically nothing more than a list of each recipe's ingredients!!! I would have NO IDEA how to put "whatever" together. Here is exactly what is written on the 3x5" recipe card from Elaine Wiggins' filed under PIES AND PASTRIES:

PIE CRUST
2 cups flour
1 cup lard
1 tsp. salt
1/4 cup water
1 quart fruit Peaches: 1 cap almond extract
1-1/2 cups sugar Apples: 1/2 to 1 tsp. cinnamon
3 Tbsp. flour Blueberries: 1-1/2 to 1-3/4 cups sugar
Cherries: If using canned Thank-You brand instead of fresh, add only 1/4 cup sugar and NO flour.

Bake at 400 degrees for 15 min. and then 350 degrees for 40 to 45 minutes
//////////////////////////////////////////////////////////////////////////////////////////////////////////////////////////////////////////////////

Wigs back live: I didn't even know what size pie pan to use. Mother had ancient aluminum ones with sides to catch any juice spillover. See the following example (Truth be told==> Marilyn, you could use one of these if you can find one at some estate sale!) :


Mom always used the above type pan when making pies. She would have acquired those during the WWII era. Now from watching my mother crank out pies all the time, I had the advantage of being familiar with pie-making technique, but my job was always to peel and core the fruit so I wasn't any expert at the details of making and rolling out crusts. Also, Mom knew which apple types were sweeter and so adjusted sugar amounts appropriately. I had no clue with that. I did know that one measured the 1-quart apple or peach amounts AFTER peeling, coring and quartering, but BEFORE slicing the fruit. She used a square quart-sized Tupperware container for that particular measurement.

After getting a place of my own that was 2 hours out of town from the home place, I spent a lot of money calling Mother long distance to ferret out details regarding pie making; vegetable soup making (who knew that carrots and green beans take longer to cook in vegetable soup than potatoes, for instance?); lasagna specifics; or a "simple" pot roast as in which cut of meat does one use? Etc., etc. etc.!

Those were the days! Happy apple pie baking, Marg. Wigs
 

OUR FAVORITE APPLE PIE​

You Will Need​

Pie dough for top and bottom 9-inch pie, chilled, see our Flaky Pie Crust Recipe
4 to 4 ¼ pounds baking apples (7 to 8 apples), see notes for suggestions
1/2 cup (100 grams) light or dark brown sugar
1/2 cup (100 grams) granulated sugar
1/4 teaspoon fine sea salt
1 teaspoon ground cinnamon
1/4 teaspoon ground ginger
1/4 teaspoon ground cardamom
1/4 teaspoon ground allspice
1/4 teaspoon freshly grated nutmeg
2 tablespoons cornstarch or use 4 tablespoons tapioca flour/starch
1 tablespoon butter
1 egg

Directions​

  • Make Apple Filling
  • Peel, and then cut the apples in half. Remove the cores, and then slice apple halves into thin slices, about 1/4-inch thick. Place the apple slices into a very large bowl.
    Scatter both sugars, salt, and spices over the apples, and then use your hands to toss them, coating the apple slices as much as possible. Set aside for 1 hour at room temperature.
  • Prepare Pie Crust
  • Roll out the first half of pie dough on a lightly floured work surface. To prevent the dough from sticking and to ensure uniform thickness, roll from the center of the dough outwards and keep lifting up and turning the dough a quarter turn as you roll. Check for the correct size by inverting the pie dish over the dough. The dough should be about 1 1/2 to 2 inches larger than the dish.
    Being careful not to stretch it, place the dough into the pie dish, and then trim overhanging dough to within 3/4-inch of the edge of the dish. Refrigerate while you make the pie filling.
    Roll out the second half of the dough to a similar size as before and transfer it to a large parchment-lined baking sheet. Keep this in the refrigerator until needed.
  • Prepare Oven
  • Position an oven rack towards the center of the oven, and then heat the oven to 400 degrees Fahrenheit (200C)
  • Assemble Pie
  • Toss cornstarch (or tapioca) with the apples. Transfer most (if not all) of the apples into the prepared bottom crust, using your hands to really pack them down into the pie. Fill the pie until apples are mounded at the same height or a little higher as the edge of the pie crust, tucking in as many as you can. If you have too many apples, save them (see notes). See our video showing how high we pile the apples.
    Pour the juices that have accumulated at the bottom of the bowl over the apples. (If it looks like there’s more than 3/4 to 1 cup of liquid, you might want to leave some behind, see notes below). Cut a tablespoon of butter into 8 or so small pieces and dot them over the pie.
    For a double-crust pie, place the second pie dough round over the filling or cut it into strips and lattice the top (See our video in the article above or read this tutorial for how to lattice pie crust). If you are not adding a lattice crust and instead are adding the top crust in one piece, use a sharp knife to cut a few slits in the top of the crust to allow steam to vent.
    Trim excess dough from the top crust or lattice strips, and then fold the overhang underneath itself, forming a thick rim. Press it together or crimp it with your fingers (or use a fork).
    Whisk the egg with a tablespoon of water, and then use it as an egg wash by lightly brushing the top crust. This adds shine and helps the crust brown.Bake PiePlace the prepared pie onto a baking sheet lined with parchment paper (this can be the same lined baking sheet used for chilling the top crust). Bake the pie for about 75 minutes, turning a few times for even browning.
    If you notice that the pie crust is browning too quickly, mold a large piece of foil over a bowl that’s been placed upside down to make a foil dome. Place the foil dome over the pie for the remaining bake time. This will slow the browning.
    Apple pie is done when the juices are bubbling through the vents of the top crust or lattice. If you do not see bubbles, the pie needs more time. Another way to check for doneness is to use an internal thermometer. Pierce the pie in the middle then test the temperature. The pie is done when it reads 195 degrees Fahrenheit (90C). Piercing the pie is also a nice indication of how soft the apples are. If they feel too crunchy, the pie needs more time.
  • Serving
  • Be sure to cool the pie, without slicing into it, for at least 1 hour, preferably longer. Keep in mind that the pie filling does not fully thicken until it is completely cooled. So, for the absolute best results, cool the pie to room temperature, and then place it into the refrigerator for an hour or two.
    Waiting to cut into the pie until cool will prevent a soggy slice.
  • Storing and Leftovers
  • Leftover pie will keep, at room temperature, for 2 to 3 days or in the refrigerator up to a week. Rewarm slices in a 350 degree Fahrenheit oven for 5 to 10 minutes before serving them.

Adam and Joanne's Tips​

  • Best apples to use: For the most apple flavor, try a couple varieties of apples in your pie. We especially love Honeycrisp, Granny Smith, Jonagold, Braeburn, Mutsu, Pink Lady, Golden Delicious, and Jazz
  • Leftover apples: Sometimes, not all the apples we sliced make it into our pie. That’s okay, though! To use them up, add them to a skillet with a splash of water, apple juice, or nothing at all and cook until softened. A little butter or coconut oil added to the pan is also quite delicious! Serve the apples over ice cream or oatmeal.
  • Liquid amount: After 1 hour of letting the apples sit with the sugar, salt, and spices, we consistently get about 3/4 cup of liquid left at the bottom of the bowl. A little more or a little less is fine, but if you find that your apples released much more, you might want to consider leaving a little behind. (When apples are overripe, they can release more liquid than usual, which can make your pie a bit more runny.)
  • Recipe has been inspired and adapted by Bravetart’s apple pie.
  • Nutrition facts: The nutrition facts provided below are estimates. We have used the USDA database to calculate approximate values.
If you make this recipe, snap a photo and hashtag it #inspiredtaste — We love to see your creations on Instagram and Facebook! Find us: @inspiredtaste
Nutrition Per Serving: Serving Size 1 slice (8 total) / Calories 583 / Total Fat 25.2g / Saturated Fat 15.4g / Cholesterol 64.8mg / Sodium 226.4mg / Carbohydrate 88.6g / Dietary Fiber 4.2g / Total Sugars 50.4g / Protein 5g
AUTHOR: Adam and Joanne Gallagher


Hey wigs,
Could you edit the apple pie recipe so it doesn't have as many indents? I was looking at this thread on my phone this morning and couldn't figure out what I was seeing. Then I remember yesterday (when I was on my 16" laptop) that the author had indented and then indented and then indented the various steps. What this ends up displaying on a phone is a single line of letter, like this:

View attachment 1919

I can also edit the recipe if you would prefer. Just let me know.
PS: My wrists are feeling much better today. Thanks for caring.
PPS: I didn't win anything at the fair.
Marilyn--I tried--see bottom post which is strictly a copy & paste + my attempt at re-formatting the Inspired Taste's recipe straight from their site. I was afraid I'd accidentally delete my above fleshed-out post with my personal comments on what exactly I did (like adding some freshly squeezed lemon juice, for instance) so I didn't fiddle around with my original post. Am elated to hear your wrists are healing and feeling better. I still have a couple scars/marks from 15 or more years ago when learning how to make caramel under charlie's tutelage. A couple drops popped out of the pan and landed on the back of my left wrist. YEOUCH--been there, done that and 'twas no fun. Wigs
 
You did well. I did go ahead and edit the first entry just so any phone users missed your edited version because they didn't scroll all the way down. I changed your comments to RED. Please review and confirm that I didn't miss any of your valuable tips and edits..
 
Last edited:
Also, a HUGE change for me in making caramel was melting only 1/4 of the sugar amount at a time. Say the recipe calls for 2 cups of sugar. I use a 3.5 qt non-stick pot and sprinkle 1/2 C of sugar. When it is mostly melted (much higher temp then just regular sugar) sprinkle on the next 1/2 C. And so on until all the sugar has been added. It will melt quicker with each addition because the now liquid sugar portion is so much hotter. I haven't ruined a batch of caramel or a flan base since using this method. No need to add water. No need to wash down the sides. Perfect every time.
God Bless Theo Chocolates in CA for their cookbook.
 
Oh my! I think we’ve all done this exactly once before always using a baking sheet with sides from that point forward. Lucky for me, it happened at a friends house, aka her oven, during “the peach pie incident“. For the life uf us we couldn’t get the smoke dectector to stop and somehow her husband managed to nap through the whole mess.

I’m going to have to try this now it’s apple season, though I pretty much called apple pie testing done after dorie’s all American in t&t. I think it’s the lemon that adds the extra zing. That and the mix of apple types, I never use less than 5 types of apples. (You can tell I don’t have an apple tree.)
 
Also, a HUGE change for me in making caramel was melting only 1/4 of the sugar amount at a time. Say the recipe calls for 2 cups of sugar. I use a 3.5 qt non-stick pot and sprinkle 1/2 C of sugar. When it is mostly melted (much higher temp then just regular sugar) sprinkle on the next 1/2 C. And so on until all the sugar has been added. It will melt quicker with each addition because the now liquid sugar portion is so much hotter. I haven't ruined a batch of caramel or a flan base since using this method. No need to add water. No need to wash down the sides. Perfect every time.
God Bless Theo Chocolates in CA for their cookbook.
I missed this caramel tip, but then I haven't been logging in as often as I used to so definitely my fault. Thank you! What a good idea. I've never made caramel this way, but will from here on out.
You did well. I did go ahead and edit the first entry just so any phone users missed your edited version because they didn't scroll all the way down. I changed your comments to RED. Please review and confirm that I didn't miss any of your valuable tips and edits..
A big THANK YOU for fixing the format problems in my first post above, and it was genius of you to put my personal comments in red. I will have to remember to do that in any of my future posts. BTW, did you check out the pic of the retro pie pan with sides that catch any spillover juices? My mom had 2 pie pans like that and always used them because they nearly always saved her having to clean a messy oven by hand. (Reference my reply to Marg above to view the juice catchers on pie pans of yore.)
 
Back
Top